
Quality and presets
The Quality menu in the Setup panel sets five numbers at once: how many views to render, how large and with how many samples, how many splats the result may have, and how long to train.
The three qualities
Section titled “The three qualities”| Quality | Views | Image size | Samples | Splats | Steps |
|---|---|---|---|---|---|
| Draft | 100 | 800 px | 32 | 0.3 M | 7,000 |
| Standard (default) | 240 | 1600 px | 64 | 1 M | 30,000 |
| High | 400 | 2048 px (objects: 1600 px) | 256 | 2.5 M | 30,000 |
Each quality’s tooltip in the menu gives the same numbers, for example “100 views · 800 px · 32 samples · 300 k splats · 7,000 steps” for Draft, or “400 views · 2048 px (objects 1600 px) · 256 samples · 2.5 M splats · 30,000 steps” for High.
The image size is the longer side of the views; the shorter one follows your scene’s aspect ratio. Splats is the splat budget, the most splats the result may have.
Two things depend on the kind of subject:
- Environments with automatic views choose their number of views by coverage: as many as it takes to see the scene fully, between half and twice the quality’s count (see How many). They also render geometry views and train on them on top of these steps.
- Objects at High render their views at 1600 px, like Standard. In our tests that scored better on an object than 2048 px views, for 41% less render time per view; rooms keep 2048 px, which helps them.
Override any number
Section titled “Override any number”Every number can be set on its own:
| Number | Setting | Panel |
|---|---|---|
| Views | Count | Views |
| Image size | Image Size | Rendering |
| Samples | Samples | Rendering |
| Splats | Max Splats (k), in thousands | Training |
| Steps | Steps | Training |
Each is a Blender heading checkbox in front of its field:
- Unticked, the field shows the quality’s own number for this kind of subject, greyed.
- Ticking the box, or editing the number, makes the number yours.
- Unticking returns to the quality’s number.
An environment’s automatic Count shows text while unticked: “Auto: 50–200” until its views are picked, then the count chosen, such as “Auto: 148” (see How many).
The menu’s button says how many of the five numbers are yours, for example “Draft (2 changed)”. Choosing a quality from the menu unticks all five.
The estimate in the Create Splat panel follows every change, so you can see what a number costs in time, GPU memory and disk space before you start.
What pays off most
Section titled “What pays off most”From our benchmarks, the number of views matters most. A large or cluttered room needs more views than a small one, and doubling the views adds about 2 dB: clearly sharper, with fewer artefacts. More splats and steps pay off once there are plenty of views.
A good way to work: start with Draft, then add views to the result with Improve… in the Results panel, or use a higher quality.
What the qualities gave in our tests
Section titled “What the qualities gave in our tests”In Blender’s Classroom demo scene, rendered and trained with each quality’s numbers (100, 240 and 400 views) on an NVIDIA GeForce RTX 4070 (12 GB), and scored on the same 40 views from where a visitor would stand, none of which training used:
| Quality | Score (800 px) | Training time |
|---|---|---|
| Draft | 32.4 dB | 19 s |
| Standard | 36.3 dB | 5.2 min |
| High | 36.9 dB | 11.1 min |
The Standard row was measured at 128 samples; Standard renders 64 since 3.0 alpha.49, which in our tests scored 0.04 to 0.08 dB lower and rendered a quarter to a third faster.
Rendering usually takes longer than training: a Standard view of the classroom takes about 4 seconds to render, a High view about 10 seconds. Training needed at most about 0.7 GB of GPU memory at Draft, under 1 GB at Standard and 2.8 GB at High.
Your times depend on your scene, your render devices and your GPU. The estimate’s Measure button times your scene’s render.
Quality presets
Section titled “Quality presets”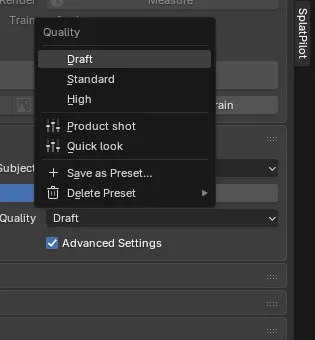
A preset stores your quality and every override under a name, so any file or scene can use it later. The menu lists your presets below Draft, Standard and High. Its button shows the preset your current settings match; otherwise the preset applied or saved last, with how many of its settings differ now, for example “Product shot (1 changed)”.
Save as Preset… asks for a name and stores:
- the quality;
- the Views settings: Count, Geometry Views and Focus Weight;
- the Rendering settings: Samples, Noise Threshold, Denoise, Image Size, Min Roughness, Sky Dome and Test Views;
- the Training settings: Steps, Max Splats, SH Degree, Opaque Splats, Focus Detail and Preview Every.
The subject, the kind, the views’ Source and the render engine (Engine) stay the scene’s own; a preset does not change them. A preset saved before 3.0 alpha.40 also names an engine, which is ignored. When a preset of that name exists, the dialog says so: “A preset named Product shot exists: Save replaces it”.
Choosing a preset sets the scene’s settings to it; settings the preset does not name stay as they are. Delete Preset removes one. Blender asks first: “Delete Quick look?”, or for a project preset “Delete Product shot for everyone on the project?”.
Use Its Settings in a splat’s menu in Results applies the settings that splat was trained with the same way.
Sharing presets in a Blender Project
Section titled “Sharing presets in a Blender Project”Your presets are stored in SplatPilot’s user data, so every file on your computer can use them.
Inside a Blender Project, Save as Preset… also offers
Share with Project (on by default there): the preset is then saved in the project’s SplatPilot
folder (presets/), where everyone who works on the project finds it. Shared presets carry the
team icon in the menu. When a project preset and one of yours have the same name, the project’s
wins.