
Views
A view is one camera position and direction that SplatPilot renders and trains on. The Views panel decides where they go; the Coverage panel after it says how well they see the subject. Good views matter more for the splat’s quality than anything else: a splat can only show well what its views saw.
Choose a source
Section titled “Choose a source”Source, the tabs at the top of the panel, picks where views come from:
| Source | Views |
|---|---|
| Automatic (default) | Planned by SplatPilot for your subject: around it for an object, inside it for an environment |
| Rigs | The views of the camera rigs you build in this file: see Rigs and targets |
| Cameras | Every perspective camera of a collection you pick |
Automatic views
Section titled “Automatic views”How many
Section titled “How many”Count sets how many views to render. More views cost render time and make the splat sharper from more places, about 2 dB per doubling. Like the quality’s other numbers, it is a heading checkbox: unticked, the field shows the quality’s own count, greyed; ticking the box or editing the number makes the count yours; unticking returns to the quality’s. See Quality and presets.
Unticked:
- An object gets the quality’s count: 100 for Draft, 240 for Standard, 400 for High.
- An environment with Geometry Views on (the default) gets as many views as it takes to see the scene fully, at least half and at most twice the quality’s count. The field then reads “Auto: 50–200” at Draft, and the estimate shows that range with the time for both ends. Once the Views button (Create Splat panel) has picked the views, it reads the count chosen, such as “Auto: 148”. In our test rooms, full coverage took about 200 training views at Draft. With Geometry Views off there is nothing to pick among: an environment gets the quality’s count, and the field says why, such as “240 · Geometry Views off”.
A count of your own renders exactly that many views.
Fewer or more of the picked views
Section titled “Fewer or more of the picked views”An environment’s views are picked best first, so after the Views button has picked them you can choose how many to use without picking again. The Views panel’s Use row reads, for example, Use 148 of 190: 190 views were picked and 148 are in use. Drag the number and the Coverage panel, the views in the viewport, the coverage map and the estimate follow at once. While another count is in use, Reset to Auto (148) returns to the count coverage chose; with a count of your own, the button reads Reset to 100 Views. Fewer views render and train faster and see less.
Render and Create Splat then render exactly the views shown. Each count gets a folder of its own, so splats trained on other counts keep their views; views already rendered for another count of the same pick are reused rather than rendered again. If the views rendered last are another count, Render shows red and Create Splat’s status line says so (“Train uses the 190 views of Classroom rendered last, not the views set now”): Train trains on those, Render renders the ones shown.
Object or environment
Section titled “Object or environment”The Kind in the Setup panel decides how automatic views are planned.
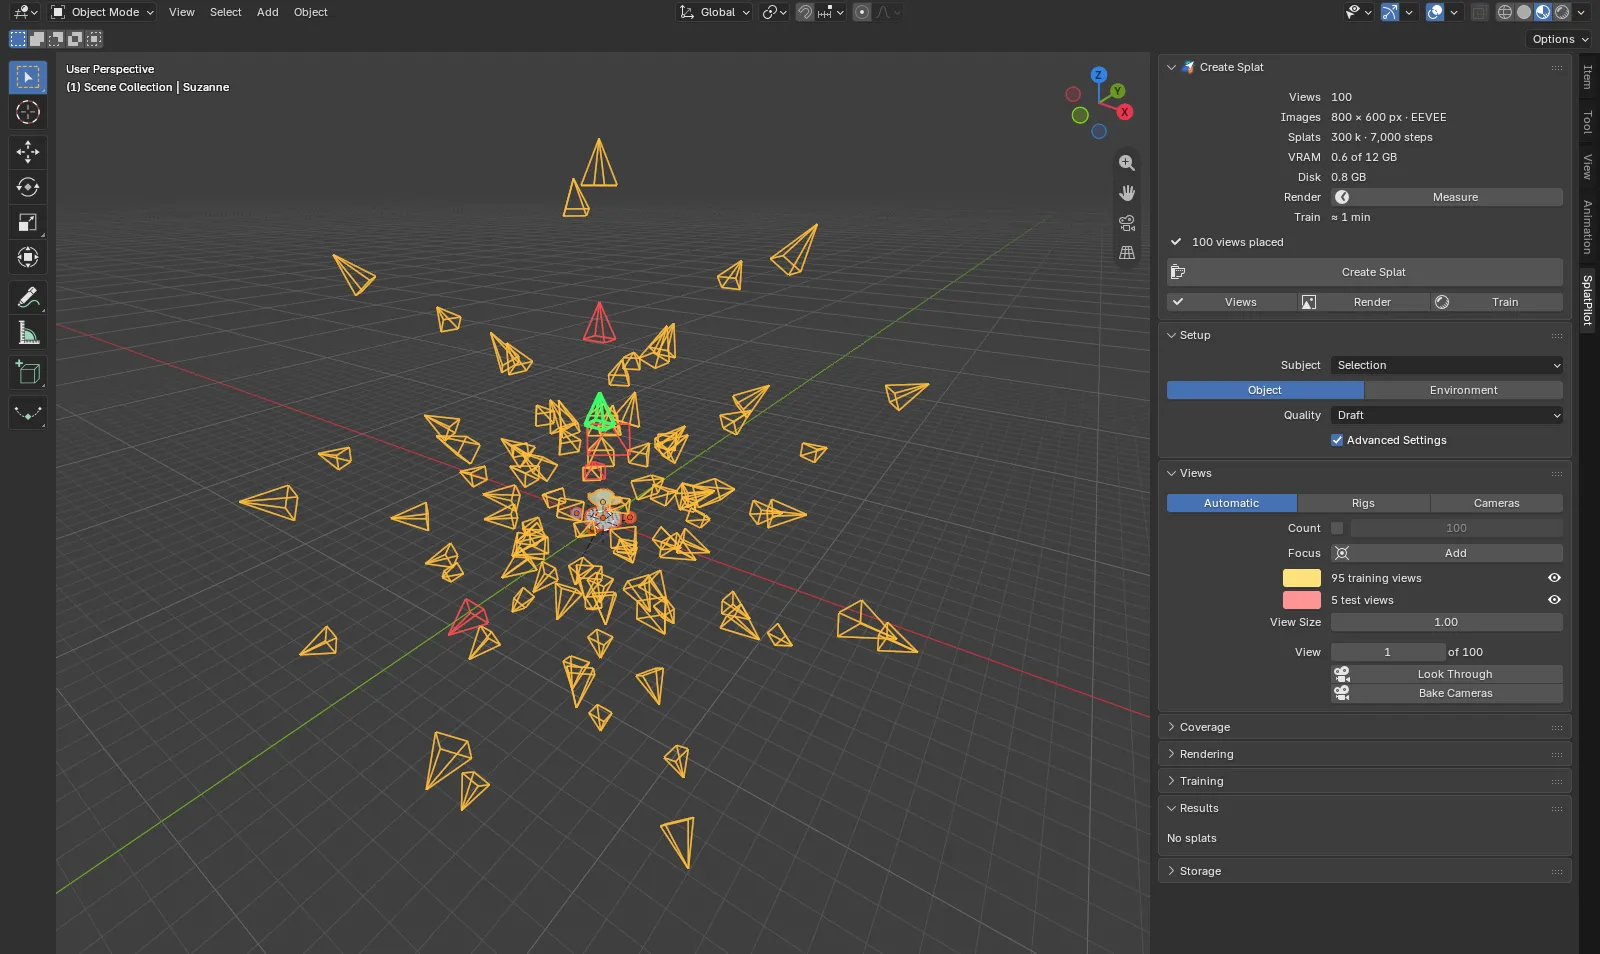
Object. The subject is seen from all around, from outside. Views sit on three spheres around it, close up, framing it and wider, and all look at it. They appear in the viewport at once when you click the Views button.
Environment. The subject is a space, or a set to be seen from everywhere. Its views are placed by the surfaces, everything at the same detail. Points spread over the subject’s surfaces tell what there is to capture; most views look at one of them from the same distance, from wherever the scene camera could get to: inside a room it stands in, along a street, above the roofs, all around a model, under the eaves. The distance follows from the surface there is, the views’ count and size, and the splat budget (no finer than the splats can show); in a room smaller than that, views stand as far back as the room allows. Once they are placed, the Views panel’s Detail row gives it, for example “1.2 cm/px at 9 m”.
Some views stand farther, so the splat also looks right seen whole. Some stand on floors, the ground and roofs at Eye Height (1.6 m by default, ±25% at random) and look around with a wide 18 mm lens, a little up or down, so it looks right from where a person would stand. Focus points get more views, from closer. No ground plane or floor height is needed: rooms, several storeys, streets, terrain and landscapes are all planned the same way.
If Create Splat warns “Only 80 of 100 views found”, there is little free space the scene camera can get to: see Troubleshooting.
Geometry views
Section titled “Geometry views”Environments Besides its views, an environment renders cheap geometry views: five times as many as the quality’s views, small (at most 400 pixels), drawn on the GPU straight from the scene (or rendered with Cycles at one sample when the scene holds what drawing cannot follow: see Rendering). They teach the splat where the surfaces are, not their colour, cost little render time, and make holes and floaters rare. Training adds steps for them on top of the views’ own: 40% of all steps (Draft: 7,000 + 4,667), which the estimate’s Splats row counts in.
The geometry views render first. The views rendered in full are then chosen among them: the ones that together see every surface from the most directions (“Choosing views” in the progress line). In our test rooms, that made splats 1 to 3 dB better than views placed at random, at the same number of views.
Geometry Views is on by default. It shows only when the kind is Environment and Advanced Settings is on (or once it is off), and there under Automatic, Rigs and Cameras alike; rigs and cameras get five geometry views per view, and their own views stay as they are.
Focus points
Section titled “Focus points”Environments A focus point marks what matters most in an environment: a bar counter, a sculpture, the hero corner of a set.
- Put the 3D cursor on it and click Add next to Focus in the Views panel (Automatic).
- Move and scale the new Focus sphere empty over the area. Its size counts: everything inside the sphere is in focus.
Two settings use focus points, each on its own:
- Focus Weight (Views panel, 4 by default; shown for an environment once it has focus points, with Advanced Settings on or once set differently) picks the views so that focus areas are seen from more places, and aims a few extra geometry views at each focus point. The number of views stays the same: more there means fewer elsewhere. 1 turns it off.
- Focus Detail (Training panel, 3 by default) makes training work harder there: the pixels showing a focus area count that many times, and more of the splats gather there. In our test room, a focus area came out 1.4 dB sharper at 3 with nothing lost elsewhere. 1 turns it off.
The placed views in the viewport
Section titled “The placed views in the viewport”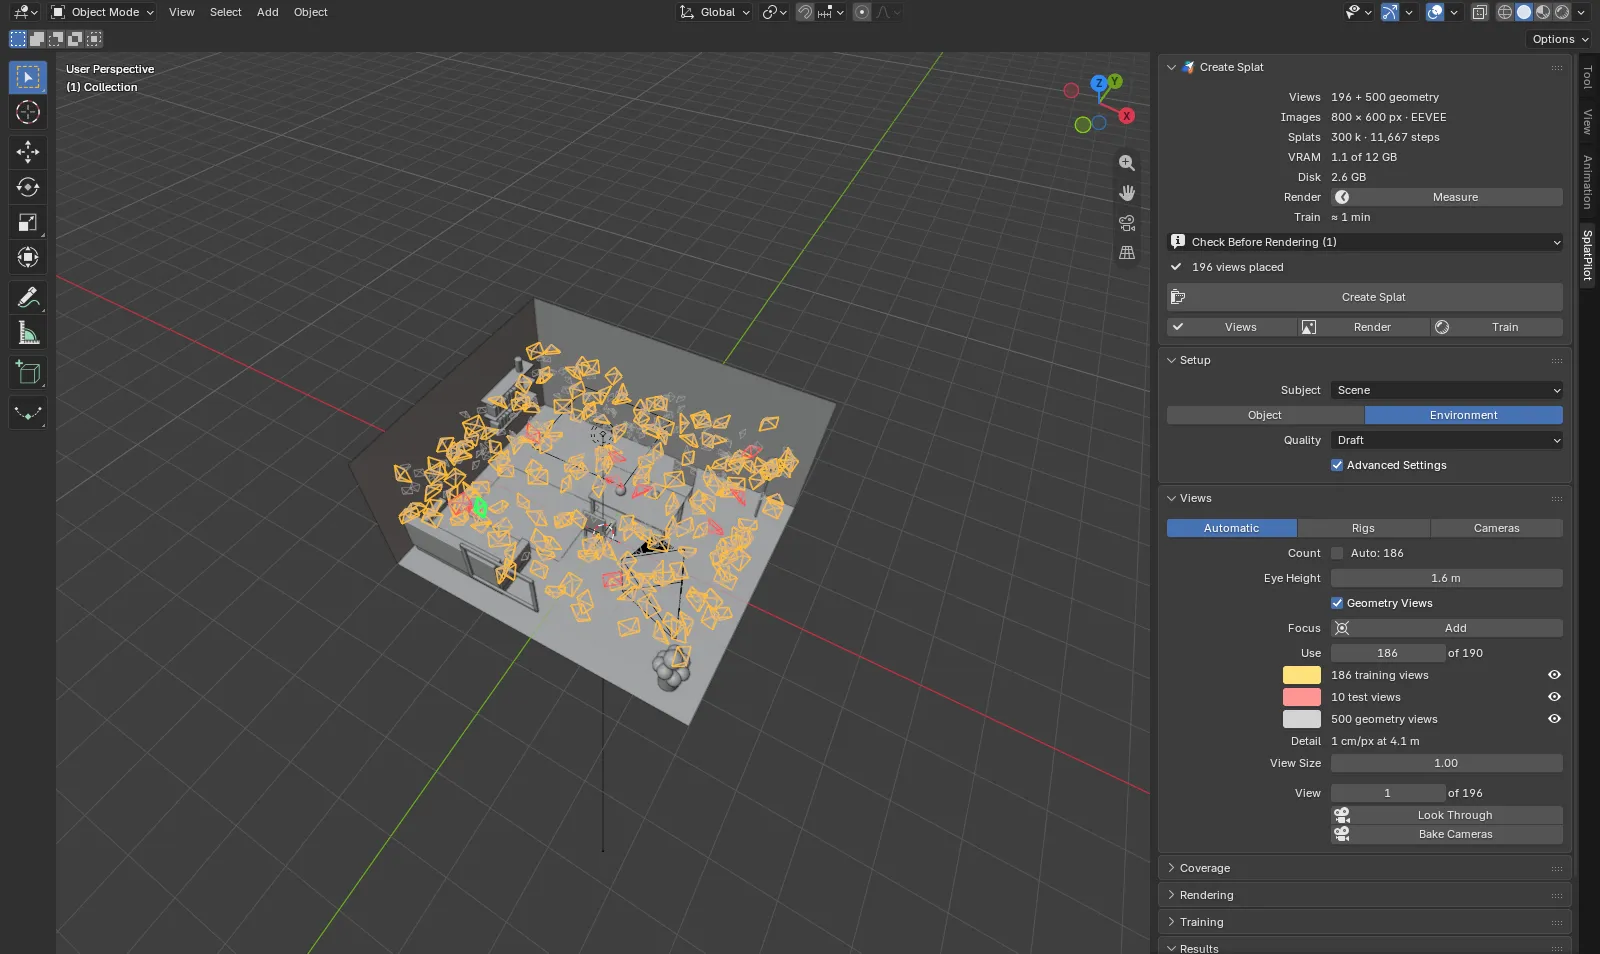
Click Views in the Create Splat panel (or Render, or Create Splat) and the placed views appear in the viewport as small camera frusta:
| Kind | Default colour | Shown |
|---|---|---|
| Training views | Amber | Yes |
| Test views | Red | Yes |
| Geometry views | Grey | No |
The Views panel lists each kind with its colour, its count and an eye: click the colour to change it, click the eye to show or hide that kind. Until views are placed, the panel reads “Not placed”.
The frusta are sized by how far apart the views stand, so dense views stay apart. View Size scales them: 0.5 draws them half as large.
- View picks one of the placed views, counted from 1: “View 12 of 95”. It is drawn in green.
- Look Through shows this viewport through that view, using a camera named SplatPilot View. The scene’s camera stays as it is. Click again to go back; orbiting the viewport also leaves it.
- Bake Cameras turns the placed views into camera objects in a new collection inside the SplatPilot collection, and switches Source to Cameras with that collection. Move, add or delete cameras by hand, then render them.
After an environment’s views are picked, the list starts with the Use row (see Fewer or more of the picked views), and the Coverage panel gives their coverage, such as “Enough views”. An object’s automatic views, and an environment’s without Geometry Views (nothing picks them), get theirs from Check Coverage in that panel instead.
Placed views hold for the settings they were placed with. Once a setting that moves them changes, they are drawn faint in the viewport, the panel’s part about them (from the colours to Bake Cameras) is greyed out, and the Views button in the Create Splat panel shows red. It places them for the current settings. See Where each step stands.
With Rigs, the views come from camera rigs you place and shape yourself: a sphere, dome, cylinder, grid or ring of views, or one view at every vertex of a mesh, each aimed at a target. The panel lists the file’s rigs, each with its number of views; Create Splat renders the views of every rig whose Use box is ticked. In an environment, Geometry Views shows below the list too. Check Coverage, in the Coverage panel, measures all used rigs together. See Rigs and targets.
Cameras
Section titled “Cameras”With Cameras, pick a collection under Cameras. SplatPilot renders every perspective camera in it, including cameras in collections inside it, each with its own focal length, sensor, shift and clipping. Orthographic and panoramic cameras are skipped with a warning. Bake Cameras makes such a collection from placed automatic views.
In an environment, Geometry Views shows here too: it adds geometry views to the cameras’ own. Check Coverage, in the Coverage panel, measures the cameras’ coverage.
Coverage
Section titled “Coverage”The Coverage panel, after Views and closed by default, says how well the views see the subject and where they fall short. An environment’s automatic views (with Geometry Views, the default) have a coverage once the Views button has picked them; until then, the panel reads “Not placed”. Rigs, cameras, an object’s automatic views and an environment’s without Geometry Views have one after Check Coverage, which the panel shows until there is a result.
The panel’s first line says what the coverage is of:
| Views | For example |
|---|---|
| An environment’s picked automatic views | “Automatic views · 148 training views” |
| An object’s automatic views | “Automatic views · 240 views” |
| Rigs | “Used rig · 42 views”, “2 used rigs · 64 views” |
| Cameras | “Cameras in Shot Cameras · 156 views” |
Below it, the verdict; for a check, a refresh button at the end of its line checks again:
| Verdict | Means |
|---|---|
| Enough views | Both bars are full: more views would add little. |
| Not enough views | Automatic views fall short: more views would see more. |
| Few directions | Rigs or cameras see the surfaces from too few sides: views from other sides and heights help. |
| Surfaces unseen | Rigs or cameras miss parts of the surface: views of the hidden parts help. |
A coverage holds for the views and the subject it was measured for. When they change, the panel reads “Outdated” below its first line, with the bars greyed out and no verdict or map. For a check, Check Again below the bars, in red, checks again (see Check Coverage); for an environment’s automatic views, the Views button picks them again.
Surfaces and Directions
Section titled “Surfaces and Directions”Two bars measure the coverage:
| Bar | What it shows |
|---|---|
| Surfaces | How much of the scene’s surface the views see at all. A cluttered room hides more corners. |
| Directions | From how many directions they see it. A surface seen from one side only looks right from that side only. |
A full bar reads “Enough”; otherwise it says how far it got, such as “72% of enough”. Enough is where more views stopped making the splat better in our tests, at Draft’s training (Standard and High make use of more). Both parts count against what a larger set of cheap views sees, from everywhere a view could stand: an environment’s geometry views, or a check’s reference set.
- Surfaces is enough once the views see 94% of the surface those views see. The rest are corners and undersides that hardly any position sees.
- Directions is enough at 88% of the directions they see the surface from. The rest are mostly grazing angles.
So views that see 99% of the surface from 88% of the directions read “Enough” on both bars: more views would add little. Views that see all of the surface but from only 57% of the directions read Surfaces “Enough” and Directions “65% of enough” (57 of the 88% needed): they need views from more sides, not more of the same. While the coverage falls short, a row below the bars says what twice the views would reach, such as 296 Views “94% of enough”.
Environments SplatPilot always renders as many geometry views as the quality plans, whatever Count says, so an environment’s coverage means the same at any view count. It tells whether the views are enough by what the scene holds, not by its size. In our tests, a classroom and a barbershop full of props both stood at about 82% with Draft’s views and stopped improving at about 200 training views, where coverage reached enough. Going from 100 to 200 training views gave the barbershop 1.6 dB and the classroom 0.9 dB.
Check Coverage
Section titled “Check Coverage”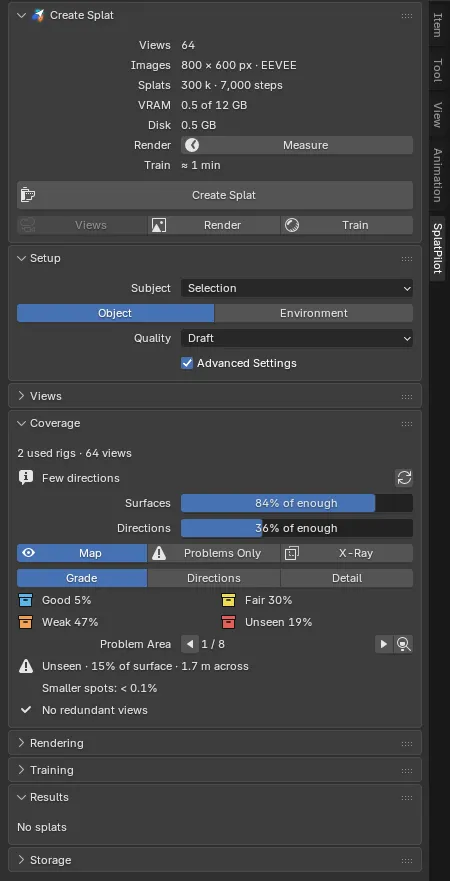
Rigs, cameras, an object’s automatic views and an environment’s without Geometry Views have a coverage once it is measured. With them, the Coverage panel shows Check Coverage until there is a result. It renders quick versions of the views (one sample, at most 400 pixels) and of a reference set around the subject, then measures them: under a minute for a rig of a few dozen views. Its own renders use Cycles on the GPU set in the Preferences whatever the scene’s engine and device, and write only the data it measures, no pictures. While it runs, the Coverage panel reads “Checking coverage…”, and the progress bar’s last stage reads “Checking coverage”. Then the button gives way to the result: the verdict with a refresh button at the end of its line, the bars and the coverage map. It measures:
- Rigs: all used rigs together, every rig whose Use box is ticked, whichever rig is active;
- Cameras: the cameras of the collection;
- Automatic (an object): its automatic views.
A check names its subject. It holds while the views, the subject (its objects and where they are), Kind, Subject Only and an environment’s Geometry Views stay as they were, also after you open the file again. When one of them changes, for example a rig or a camera, another selection or collection, or the subject moved inside a rig that stays, the Coverage panel reads “Outdated”, its figures greyed out and no map, and shows Check Again in red. The tooltip says what changed, such as “Measure the coverage again: the subject changed since the last check”. A check made by alpha.39 shows Check Again: it does not record its subject.
The refresh button at the end of the verdict runs a current check again after other edits to the scene, such as moving an object that is not the subject. It renders anew when the scene’s objects or render settings changed since; with no such change, the report reads “No changes since the last check”. Materials, lights and the world do not count: a check measures where the surfaces are, not their colour.
In an environment with rigs or cameras and Geometry Views on, the reference set is the geometry views that Create Splat trains on, rendered with the scene’s engine. A check does not render them again after a change: it reports “The scene’s objects changed since the geometry views were rendered: using them”, and Create Splat asks before it uses them (see How SplatPilot renders).
While something renders or trains, Check Coverage is greyed out (“A render or training is running”). A paused check resumes with Resume Check in the Create Splat panel.
The coverage map
Section titled “The coverage map”The bars tell whether more views would pay; the coverage map tells where the views fall short. There is one after Check Coverage, and after the Views button picks an environment’s views. Map, the button with an eye in the Coverage panel, beside Problems Only and X-Ray, shows it in the viewport: a small round dot for each spot the map samples, lying on the surface in the spot’s colour, in rows on flat surfaces, with most of the surface showing between them. A fixed light shades them, so the surface’s shape reads through the colours. Check Coverage shows the map; the Views button does not, so the placed views stay in sight. Stepping through problem areas and framing one show it too, and Create Splat leaves it as it is. While the map is hidden, its part of the panel is greyed out, all but Map.
| Grade | Colour | Meaning |
|---|---|---|
| Good | Blue | Seen sharply from most (three quarters or more) of the directions it can be seen from |
| Fair | Yellow | Seen from half of them or more, or never sharply |
| Weak | Orange | Seen from under half of them |
| Unseen | Red | No view sees it |
“The directions it can be seen from” are those any view of the check or its reference set sees it from, so a spot in a corner is not held to directions no camera can stand in. Summed over all spots, the map gives the Directions bar exactly; the colours come from your theme’s collection colours, and blue for Good keeps good spots apart from weak ones for red-green colour blindness.
Each spot takes the class most of its neighbours have: the spots within 1.5 spacings whose surfaces face the same way. The legend’s shares, the problem areas and the drawn map therefore agree, and a strip only one spot wide takes the class around it.
- Problems Only, beside Map, keeps the weak and unseen spots; X-Ray beside it shows spots behind surfaces, faint.
- Grade / Directions / Detail, the tabs below them, colours the grade, how many of its directions each spot is seen from (Most, Some, Few, None), or how sharply the closest view sees it (Sharp, Soft, Blurry, Unseen). The legend below the tabs gives each class’s share of the surface, best first.
- Problem Area ◀ 1 / 12 ▶ steps through the weak and unseen patches, largest first. The current one is circled in white on screen, through walls too, while the circle fits in the viewport; where its spots are in sight they are drawn again with a white rim. A line says what it is and how large: “Unseen · 1.2% of surface · 80 cm across”, or “Few directions · …” with a second line such as “Seen from 2 of 9 directions”. The frame button after the arrows (Frame Problem Area) turns the viewport to it, looking from where a view that sees what it misses would stand; it changes only the viewport.
- Patches too small to list count as spots: “Scattered spots: 0.4%” when there are no problem areas, “Smaller spots: 0.4%” below them. With neither, the panel reads “No problem areas”.
- Redundant (rigs and cameras): the views without which, all together, every spot keeps its grade, such as “6 views”. They are drawn in pink, crossed; the eye at the end of the row hides them. With rigs, a line per rig says how many of its views they are (“Ring: 4 of 16”). With cameras, the select button before the eye (Select Redundant Cameras) selects them, to look at or delete by hand; nothing is deleted. With Subject: Selection, that changes the subject too, and the report says so (“… · the subject (Selection) changed too”): the check is outdated until the subject is selected again. When every view adds something, the panel reads “No redundant views”.
With an environment’s picked views, Use changes the map at once: it follows the views in use. The map holds as long as the bars do, and comes back when you open the file again. Edits that leave the views and the subject as they are, such as moving another object, do not make it outdated; for a check, the refresh button at the end of the verdict checks again. An environment’s map made by alpha.39 is made again from its pick’s record when it shows; a check’s, by checking again.
- Huge scenes. A building with a large backdrop spreads its views thin. Choose the part you care about as a collection, or add views.
- Film sets. In a set with walls only where the shot needs them, views facing the open side see nothing, and views behind the set see the backs of walls.
- Improving later. Improve… in the Results panel, with Add Views, renders more automatic views of a finished splat (in an environment, where its views are thin) and trains it on with all of them.