
Rigs and targets
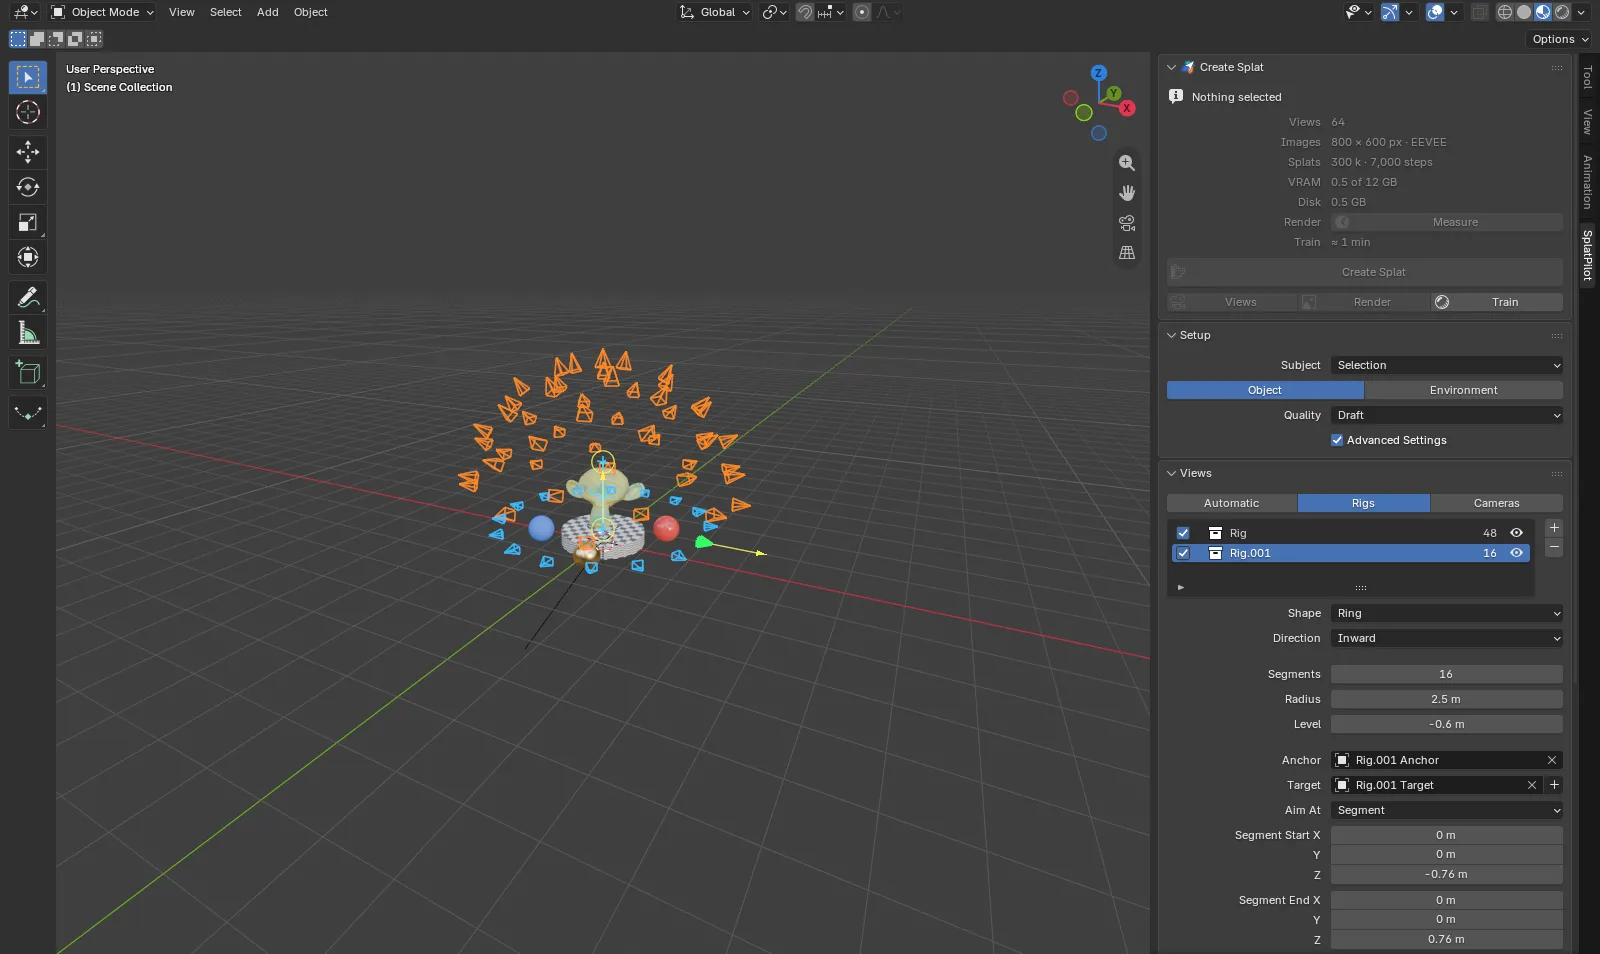
A rig is a set of views you place and shape yourself: a sphere, dome, cylinder, grid or ring of views, or one view at every vertex of a mesh. Rigs are for when you want control over where the views go, for example for a subject that automatic views do not suit, or to reuse a setup across files. To use them, set Source to Rigs in the Views panel.
Make a rig
Section titled “Make a rig”-
Select the object you want to capture (optional).
-
In the Views panel, set Source to Rigs and click + beside the rig list.
-
SplatPilot adds a rig around the selected object: its anchor sits at the object’s origin and follows it, the object becomes the rig’s target, and the radius is set to two and a half times the radius of the object’s bounding box. With nothing selected, the rig appears at the 3D cursor.
-
Shape it with the settings below the list or by dragging its handles in the viewport.
Each rig is a collection inside the SplatPilot collection. It holds the rig’s anchor, an Empty that places it, and, if you add them, its target and baked cameras.
The rig list
Section titled “The rig list”The Views panel lists the rigs of this scene. Each row has:
- Use, the checkbox: whether Create Splat renders this rig’s views. A rig that is not used is drawn faint in the viewport.
- The rig’s name: double-click to rename it.
- How many views the rig has.
- An eye: shows or hides the rig’s collection in the view layer. A hidden rig draws nothing and shows no handles.
The highlighted row is the active rig: its settings show below the list, and its handles show in the viewport. They come in groups: Shape and Direction; the shape’s own settings; Anchor, Target and how the views aim at it; Focal Length, Sensor and Colour; then View, Look Through and Bake Cameras. Selecting a rig’s anchor (or a mesh rig’s mesh) in the viewport makes that rig the active one. + adds a rig, − removes the active rig together with its anchor, its baked cameras and a target that SplatPilot added for it; the next rig in the list becomes the active one.
In an environment, Geometry Views shows below the list (with Advanced Settings): the rigs’ views then come with geometry views too, five per view.
Check Coverage, in the Coverage panel, measures all used rigs together, whichever rig is active: how well their views see the subject. The panel then gives the verdict, such as “Few directions”, the Surfaces and Directions bars and the coverage map. See Check Coverage.
Shapes
Section titled “Shapes”| Shape | Views | Settings |
|---|---|---|
| Sphere (default) | Evenly spread over a sphere | Count, Radius |
| Dome | Evenly spread over the upper half of a sphere | Count, Radius |
| Cylinder | Stacked rings of views | Segments (views per ring), Rings, Radius, Height |
| Ring | One ring of views | Segments, Radius, Level (how high the ring sits above its anchor) |
| Grid | A flat grid of views above the anchor | Columns, Rows, Size, Level (how high the grid sits above its anchor) |
| Mesh | One view at every vertex of a mesh, along its normal | Mesh |
Every shape but Mesh stands where its anchor is: move, rotate and scale the anchor Empty like any object to place the rig. A Mesh rig follows its mesh object instead; edit the mesh to change the views.
Direction sets which way the views look:
| Direction | Views |
|---|---|
| Inward (default) | Look at the target, or at the rig’s centre without one |
| Outward | Look away from the target, or away from the rig’s centre |
| Both | Two views per point: one inward, one outward |
Focal Length is the lens of the rig’s views (50 mm by default), Sensor their sensor width (36 mm by default), and Colour the colour its views are drawn in.
Targets
Section titled “Targets”The target is the object that inward views aim at. Pick any object in Target, or click + beside it and choose a kind to add a new target: SplatPilot adds an Empty fitted around what the rig aimed at so far (a box of its bounds, a segment from its bottom to its top, or a point at its centre), parented to it so it follows. A target that SplatPilot added this way is removed again when you clear or replace the rig’s Target.
Aim At sets which point of the target each inward view aims at:
| Aim At | Views aim at | Settings |
|---|---|---|
| Point (default) | The target object’s origin | |
| Segment | The closest point of a line between two points | Segment Start, Segment End, in the object’s local space |
| Box | The closest point of a box around the origin | Half Size: half the box’s size along the object’s local axes |
A segment suits long subjects such as a car or a row of shelves; a box suits bulky ones such as a building. Because segment ends and box sizes are in the target’s local space, they move, turn and scale with the target object. Targets are drawn in cyan in the viewport.
Handles
Section titled “Handles”The active rig and its target show handles in the viewport, in Blender’s gizmo colour (yellow by default, the same as on lights and cameras). Drag them to shape the rig where you see it:
| Handle | Changes |
|---|---|
| An arrow along the anchor’s X axis | Radius (Sphere, Dome, Cylinder, Ring) or Size (Grid) |
| An arrow along the anchor’s Z axis | Height of a cylinder, or Level of a ring or a grid |
| Two rings at the segment’s ends | Segment Start and Segment End. Hold Ctrl to snap an end onto geometry. |
| Three box arrows on the box’s faces | The box’s Half Size along each axis |
Each drag is one undo step. Handles work with scaled, rotated and parented anchors and targets. They show while Source is set to Rigs and the active rig is visible; hide them with the rig’s eye or Blender’s gizmo toggle in the viewport header. A Mesh rig has no shape handles.
Preview and bake
Section titled “Preview and bake”- View picks one of the active rig’s views, counted from 1: “View 12 of 48”. It is drawn in green.
- Look Through shows this viewport through that view (the scene’s camera stays). Click again to go back.
- Bake Cameras creates a camera object for every view of the active rig, in a collection inside the rig. Baking again replaces the earlier cameras. You can render baked cameras with Source: Cameras.