
Rendering settings
The Rendering panel (closed by default) sets how the views are rendered.
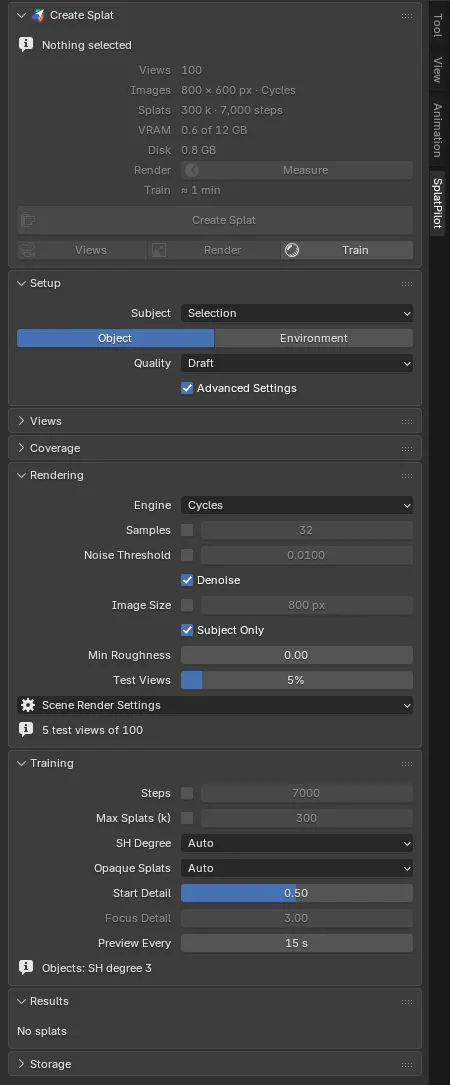
Settings
Section titled “Settings”| Setting | Default | What it does |
|---|---|---|
| Engine | The scene’s | The scene’s render engine, which the views render with. Cycles: path traced, the most faithful views. EEVEE: much faster views; screen-space effects may differ between views. See below. |
| Samples | Unticked: the quality’s | Render samples per view. Unticked, the field shows the quality’s: 32, 64 or 256. See Samples and noise. |
| Noise Threshold Advanced | Unticked: the scene’s | Cycles. Where adaptive sampling stops: lower renders cleaner and slower. See Samples and noise. |
| Denoise Advanced | On | Cycles. Denoise the views. See Samples and noise. |
| Image Size | Unticked: the quality’s | The longer side of the views in pixels; the shorter side follows your scene’s aspect ratio. Unticked, the field shows the quality’s: 800, 1600 or 2048 (1600 for objects at High). |
| Subject Only (objects) | On | The views show only the subject; other objects still light, shade and reflect in it. Shown for Kind: Object with Subject: Selection or Collection. See below. |
| Min Roughness | 0 | Renders every glossy surface at least this rough, for clean instead of blotchy reflections. Only the views change, not your file’s materials. See Shiny surfaces. |
| Sky Dome (environments) | Off | Adds the world as a sky around the splat. See below. |
| Test Views Advanced | 5% | The share of views the splat is scored on but not trained on. See below. |
| Scene Render Settings | Lists the scene’s render settings the views leave out or keep. See below. |
Samples and Image Size are heading checkboxes: ticking one or editing its number makes it yours, unticking returns to the quality’s. See Override any number. Settings marked Advanced show with Advanced Settings on (Setup panel), and also with it off once they are set differently from their default.
Samples and noise
Section titled “Samples and noise”How many samples a view needs depends on the scene: fog and smoke, glass, small bright lights and much bounced light leave more noise at the same count. The qualities’ counts (32, 64 and 256) are a starting point: raise Samples where the views come out noisy. Noise in the views trains into fuzz in the splat. In our tests, Standard’s 64 samples scored 0.04 dB (a room) and 0.08 dB (the Classroom) below 128 and rendered a quarter to a third faster.
Noise Threshold (Cycles) is where adaptive sampling stops: a pixel whose noise is below it gets no more samples. Unticked, the views take the scene’s: its own threshold, or Cycles’ default 0.01 where the scene’s is coarser than 0.05 (see Scene Render Settings); where the scene renders every pixel to the full samples (adaptive sampling off), the field reads “Scene: Off”. Ticked, the views render with adaptive sampling at your threshold, whatever the scene’s; lower renders cleaner and slower. Like the samples, it is part of the views’ render settings: views rendered with another threshold are a set of their own.
Denoise (Cycles, on by default) denoises every view. Off, the views keep their noise, which only very many samples make small enough to train on.
Engine
Section titled “Engine”Engine is the scene’s render engine, the one in Render Properties > Render Engine: setting it in the Rendering panel sets the scene’s, and setting it in Render Properties changes the field. The views render with it, and the estimate’s Images row names it. When the scene renders with Workbench or an add-on’s engine, the field shows Cycles, the views render with Cycles, and a line under the field names the scene’s engine, such as “Scene: Workbench”.
Presets and Use Its Settings leave the engine as it is. Check Coverage renders its own views with Cycles whatever the engine. The recipe line in Results ends with the engine a splat’s views were rendered with.
Files saved before 3.0 alpha.40 with Cycles or EEVEE chosen in SplatPilot keep their scene’s own render engine: their next views render with it.
Subject Only
Section titled “Subject Only”Subject Only is shown for Kind: Object with Subject: Selection or Collection, and is on by default. The views then show only the subject. The other objects that render are still in the render copy: they light and shade the subject and show in its reflections, but their camera visibility is off, so the views do not see them. What the subject instances stays visible: the objects of a collection instance, a particle system’s objects, and the objects and collections its Geometry Nodes take in through nodes such as Object Info and Collection Info. Objects given to a Geometry Nodes modifier as its own inputs are not kept.
Off, the views show everything they see, and all of it trains into the splat. With Subject: Scene, or for an environment, the views always show everything.
The subject’s objects are part of the views’ render settings: views rendered with Subject Only are a different set from views of the same scene with everything in them, kept under a dataset name of their own.
Scenes in which SplatPilot was used before 3.0 alpha.39 open with Subject Only off, so their views stay as they were. Saving the file stores the choice.
The views render with a transparent background, so a splat has no sky of its own: Blender shows the world behind it, other viewers show nothing. With Sky Dome on (environments only), Create Splat also renders the world once as a panorama from the middle of the subject, after the views. After training, a sphere of 40,000 flat splats far around the scene takes its colours and joins the result as its own splat object named after it (“Scene Splat Sky”, say), in the Splats collection.
The dome costs no training and takes nothing from the scene’s splat budget; it shows exactly the world (sky, HDRI), not objects in the distance. An export of the result leaves it out, since it is its own object. Results shows the dome below its splat (“Sky dome · 40,000 splats”), with an eye that hides it, not as a row of the list. Deleting the splat deletes its dome too. Sky Dome is taken when you click Create Splat: changing it while the views render applies to the next run.
Test views
Section titled “Test views”Test views are rendered like the others but held out of training. After training, SplatPilot compares the splat with them, and the score in dB (PSNR) in the panel and in Results says how closely the splat matches views it never saw. Compare it between runs of the same views: it depends on the scene and its background, so it means little between scenes.
Test views cost render time but add no detail to the splat. At 0% none are rendered and there is no score. The panel ends with a line on them: “5 test views of 100”, or “No test views: no score”. Every n-th view becomes a test view (at 5%, every 20th); with your own cameras, that is the first camera by name and every 20th after it.
Scene Render Settings
Section titled “Scene Render Settings”Scene Render Settings opens the Render Settings for the Views popover: the scene’s render settings the views leave out, keep or leave unchanged, each with your value, the views’ value and why, and Keep where a setting can be kept. It is the render-settings part of Create Splat’s Check Before Rendering, here at any time, also when nothing in it needs a decision. With nothing to list, it reads “No render settings to leave out”.
How SplatPilot renders
Section titled “How SplatPilot renders”SplatPilot renders in a second Blender running in the background, so your Blender stays free:
- It opens your saved file, or a temporary copy next to it when the file has unsaved changes (an unsaved file, or one whose folder takes no copy, gets it in the job’s folder). The copy packs nothing, also with Automatically Pack Resources on, and is deleted afterwards.
- It sets its render settings in its own copy only: samples, noise threshold and size from this panel, PNGs at compression 15 and only the passes the views read (a file’s own passes, AOVs and light groups cost render time and nothing reads them), Cycles when the scene’s engine is neither Cycles nor EEVEE, a transparent background, no motion blur, no depth of field, the scene’s current frame and, with Subject Only, the other objects’ camera visibility off. Your file and your scene’s settings are not changed.
- Cycles renders with the devices chosen in Edit > Preferences > System. The colour views follow the scene’s engine and Device (Render Properties).
- Geometry views and a coverage check’s renders are drawn on the GPU straight from the scene, as a render sees it (render subdivision levels, render visibility): only their positions, normals and coverage are read, two to twenty times as fast as Cycles. See-through materials (leaves, fences, glass, water, from their Alpha or a Transparent BSDF, also through math, ramps, Fresnel, Light Path, Object Info, image textures and Noise and Voronoi textures), true displacement and instanced objects come out as Cycles renders them; volumes are not drawn, so the surfaces behind them count. Only the nodes deciding transparency and displacement matter: colour, roughness and normal maps never do. When the scene holds something drawing would get wrong (a texture such as Wave or Brick driving transparency or displacement, hair, point clouds, holdouts, or more triangles than the GPU takes), Cycles renders them instead, without light bounces, on the GPU chosen in the Preferences even when the scene’s Device is CPU, and the CPU if the GPU cannot render the scene.
- Each view is written as a picture and as an EXR with the data training reads: linear colour and every pixel’s position and normal. Geometry views are written as the EXR alone.
Rendered views are kept on disk and reused whenever the views and render settings are the same, so changing a Training setting never renders again. See Storage and Blender Projects.
When the scene changed since its views were rendered (an object moved, a material, a light, the world or the render engine’s settings), Create Splat, Views, Render and Train ask first, in a dialog that names the change (“Changed since the views were rendered: …”): Render Again renders the views with the scene as it is now, Use the Old Views keeps them and counts them as the scene’s from then on.
Bright surfaces and AgX
Section titled “Bright surfaces and AgX”Splats keep colours up to four times brighter than white. Sunlit and lamp-lit surfaces therefore look as bright as in your renders under AgX (Blender’s default view transform) and Filmic. Anything brighter, like the sun’s glint in chrome, is clipped at that.