
Setup
Where: SplatPilot tab > Setup, below Create Splat, open by default.
What becomes the splat, where SplatPilot places automatic cameras, and the quality setting for the cameras, images and training.
| Setting | Default | Description |
|---|---|---|
| Subject | Object | What becomes the splat: an Object, a Collection or the Scene. See Subject. |
| Object | None | With Subject: Object, the object to splat, with its children. SplatPilot names the splat after the object. |
| Collection | None | With Subject: Collection, the collection to splat, with the collections inside it. |
| Kind | Object | Where SplatPilot places automatic cameras: Indoor, Outdoor or Object. See Kind. |
| Quality | Standard | Draft, Standard, High or a saved preset. Pick one to set the camera count, image size, samples, splat budget and steps. See Quality. |
| Advanced Settings | Off | Tick it to see settings usually left at their defaults, in every file. See Advanced Settings. |
Subject
Section titled “Subject”- Object: the object in the Object field, with all its children. SplatPilot names the
splat after the object, such as
Suzanne Splat. - Collection: the objects of the collection in the Collection field, with the collections inside it. SplatPilot names the splat after the collection.
- Scene: everything in the scene that renders. SplatPilot names the splat after the scene.
Only objects that render count, and splats SplatPilot made never do. To splat several objects, put them in a collection or parent them to one of them. With no object picked, nothing runs, and you see “No object” in the Create Splat panel.
With the Kind tabs, you choose where SplatPilot places automatic cameras:
- Indoor, for a room or a house: throughout the subject’s covered space, facing its surfaces, some at eye height.
- Outdoor, for a street, a site or a landscape: around and above the subject, facing its surfaces, some at eye height, none below the ground.
- Object (default), for a product, a model or a vehicle: around the subject looking in, at distances from close up to far enough that all of it is in view, also from below.
With Indoor and Outdoor, SplatPilot adds Eye Height and the advanced Geometry Cameras and Focus Weight to the Cameras panel, and Sky Dome to Rendering. With Subject: Object or Collection and Kind: Object, SplatPilot adds Subject Only to Rendering. See Indoor, Outdoor or Object for how SplatPilot places the cameras for each kind.
Quality
Section titled “Quality”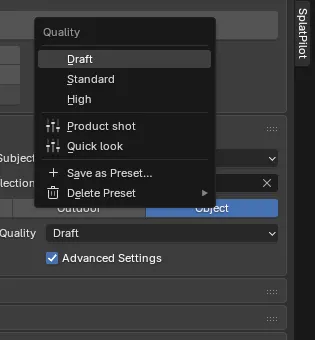
In the menu you find the three qualities, your saved presets, Save as Preset… and Delete Preset. A quality is a set of five numbers, which you also see in its tooltip:
| Quality | Cameras | Image size | Samples | Splats | Steps |
|---|---|---|---|---|---|
| Draft | 100 | 800 px | 32 | 300 k | 7,000 |
| Standard (default) | 240 | 1600 px | 64 | 1 M | 30,000 |
| High | 400 | 2048 px, objects 1600 px | 128 | 2.5 M | 30,000 |
The image size is the images’ longer side. Splats is the splat budget, the most a splat may have. Indoors and outdoors, the camera count is automatic by default: from half to twice the quality’s count, as many as it takes for full coverage.
Count in Cameras, Samples and Image Size in Rendering, and Steps and Max Splats (k) in Training each have a checkbox in front of their field. With the box unticked, you see the quality’s number in the field, greyed. Tick the box or edit the number to set your own. On the menu’s button you then see how many numbers you changed, such as “Draft (2 changed)”. When you choose a quality in the menu, SplatPilot unticks all five boxes.
In our tests
Section titled “In our tests”These runs used Blender’s Classroom scene with Kind: Indoor on an NVIDIA GeForce RTX 4070 (12 GB). Each splat was scored on the same 40 cameras, which none of the splats was trained on. The camera count mattered most: more splats and steps paid off once there were plenty of cameras.
| Quality | Score | Rendering | Training | In all |
|---|---|---|---|---|
| Draft | 31.7 dB | 79 s | 40 s | about 2 min |
| Standard | 35.5 dB | 11 min | 8 min | about 19 min |
| High | 36.9 dB | 43 min | 18 min | about 1 h |
Click Measure in the estimate to time your own scene’s render.
Presets
Section titled “Presets”Click Save as Preset… to save the quality with these settings under a name, for every file on your computer:
- Cameras: Count, Geometry Cameras and Focus Weight
- Rendering: Samples, Noise Threshold, Denoise, Image Size, Min Roughness, Sky Dome and Test Cameras
- Training: Made For, Steps, Max Splats (k), SH Degree, Opaque Splats, Start Detail, Focus Detail and Preview Every
With a preset, everything else stays as it is, such as the subject, the kind, the camera setup and the render engine. When you save under a name in use, SplatPilot replaces that preset, and says so in the dialog first.
Choose a preset in the menu to set the scene’s settings to it. On the menu’s button you then see the preset’s name and the number of later changes, such as “Product shot (1 changed)”. Under Delete Preset you find the presets, and Blender asks before it deletes one. With Use This Splat’s Settings in Results, you set a splat’s own settings the same way.
Presets in a Blender Project
Section titled “Presets in a Blender Project”In a Blender Project, you also find
Share with Project in Save as Preset…, on by default. With Share with Project ticked,
the preset is saved in the project’s storage folder, under presets, for everyone on the project.
SplatPilot marks a shared preset with a team icon in the menu. A shared preset is used instead of a
preset of yours with the same name, and when you delete it, it is deleted for everyone, after
Blender asks.
Advanced Settings
Section titled “Advanced Settings”Tick Advanced Settings to see settings usually left at their defaults:
| Panel | Settings |
|---|---|
| Cameras | Geometry Cameras, Focus Weight |
| Rendering | Noise Threshold, Denoise, Test Cameras |
| Training | SH Degree, Opaque Splats, Start Detail, Focus Detail, Preview Every |
A setting changed from its default is always shown. The switch is the one in SplatPilot’s preferences, so it holds for every file.